Related Posts Plugin for WordPress, Blogger...
Showing posts with label DIY. Show all posts

Wednesday, February 3, 2016

· A Gold Dot Party! ·


Kathryn and I have had this thing for gold dots lately.  You know, the kind that show up all over Pinterest and on everything from sheets to sheet cakes nowadays.

It had been going on for a little while when I came across my gold dotty fabric.  I needed a few excuses before I'd be ready to splurge on the fabric, so one of my "reasons" was that K and I would host a Gold Dot Party.  Well, the time and place was now!  My dress was long-since done, Kathryn's outfit was complete (did you notice how we had entirely circular reasoning going on here?  Yeah, we don't care), Christmas decor was drastically clearanced, and the social wasteland of the early portion of the year was upon us!

Gold Dot Party indeed.  We did our best to live up to the theme, albeit there were some aspects where we had to cut corners.  Oh well, nothing too glaring. ;-)

So here you go- a party all about gold and all about polka dots!  Enjoy!


I made over 180 feet of garland for the party out of 1,250 gold discs (go big or go home is my motto when it comes to these things!)- it was a fun project and I adore the way it turned out!  Now I'm just looking for ways to incorporate it into every party we have...


We compiled a Pinterest board of our favorite gold dot ideas, and dotted champagne flutes were on the "must do" list. ;-)  Due to my job, I wasn't able to help out with the majority of prep but Kathryn did a wonderful job on them!


The backdrop for the food table is entirely the handiwork of Tara, Kathryn, and Kristen- didn't it turn out smashingly??  Clearanced Christmas ornaments for the win!

And I have to mention here- major props to Tara for her help in all the prep for this party!  Without her diligent work taking care of details, our party would not have been nearly as successful!!  Thanks again, dear!


Kathryn's amazing calligraphy is always welcome. :-)  You should have seen her handiwork on the invitation envelopes!  Stunning!


Kathryn has this cute antique end table (that I always want to steal from her), but the top is rather beat up.  We covered it with gold dot wrapping paper (another Christmas clearance score!) and voila!  A properly theme-fitting area for decorating nails. ;-)


Artisan Bread - from this book (*highly recommended!*)
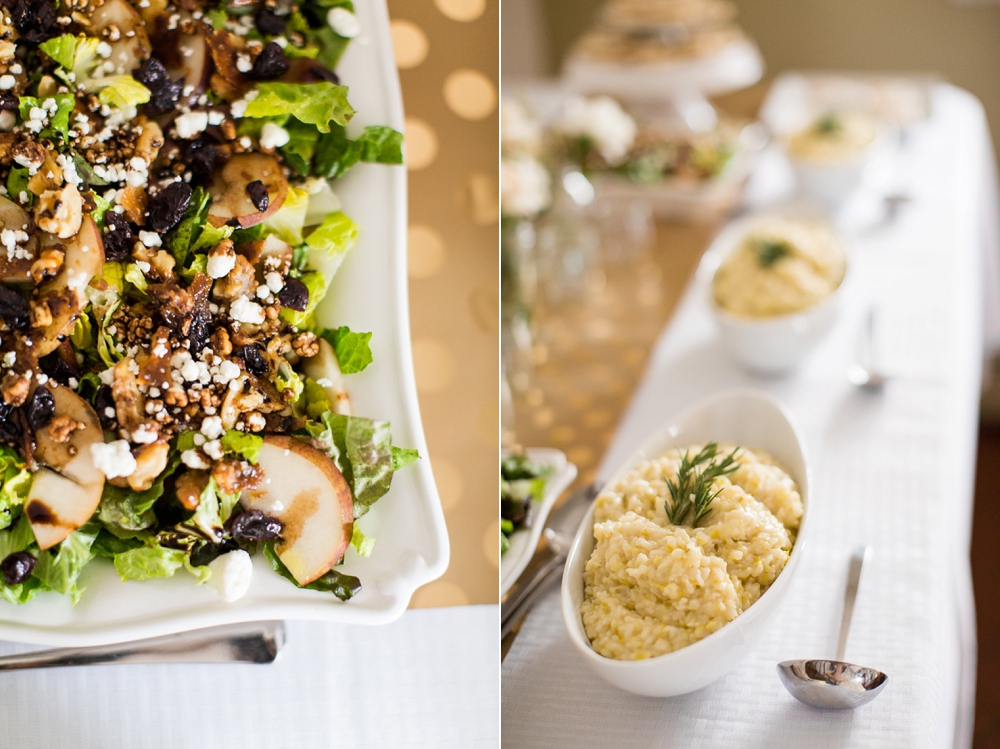

Pear, Goat Cheese, Candied Walnut, and Craisin Salad · Authentic Tuscan Risotto


Here's a little preview for you of Kathryn's gold dotty outfit.... now we just need to find a great photoshoot location for a full-fledged post!


My dear friend Marie Michelle was able to make it for the occasion, too! :-)


All in all, it was a great excuse for a delightful day spent with a delightful group of ladies!! :-)

(and it was also a great excuse for that fabric!)

· Photos by Kathryn ·

Thursday, December 3, 2015

· Deck the Halls Skirt Tutorial ·


For my post this week, I'm joining in the Riley Blake Fabrics' Christmas Stitch 'n' Kitchen Blog Tour!  I had such a fun time picking out which fabrics I wanted to use for a project, and of course I couldn't resist going in a quirky, mid-century direction. ;-)  This is now the second "novelty" Christmas outfit I've made... I sense a trend coming on...

Without further ado, here's my tutorial for making your own!

"Deck the Halls" Christmas Ornament Appliqués
Prep time: 10 minutes
Making time: 45-60 minutes (per appliqué)
Ingredients:

I adore the 1950s, so naturally I used my appliqués on a 1950s style circle skirt!  The appliqué design is so versatile and it could be used on just about anything.  Tea towels, tote bags, other clothing items- the list goes on! :-)


Step 1- Cut out appliqués, adding extra if appliquéing by hand.  The pattern is for the finished size, so I added 1/4" to the perimeter of mine.


Step 2- Mark the finished size on the wrong side of the fabric for an accurate finished result.  I used a blue water-soluble pen, but it's a bit harder to see the marks in photos than real life. ;-)


Step 3- Staystitch along the marked line by machine, then use the stitched line as a guide for folding in the excess.  Iron smooth.  I found that the circles and the curved edges of the onion shape benefited from a single line of basting near the raw edge.

*Step 3 1/2* If you're making a circle skirt, now is the time to choose your placement of the appliqués!  This is the trickiest part of the project- I just adjusted them until I was happy and measured accordingly for the rest.  The amount of appliqués you use is highly dependent upon the width of your skirt.  Mine ended up having 34 appliqués.  But that makes for some weird math to duplicate it!


Step 4- Hand appliqué the ornaments in place.  I love how much control hand-sewing affords as well as being a great way to take some time to relax and enjoy the process!  This isn't a "quick and easy" project, but especially in a season that can get hectic and stressful, I enjoy having a project that forces me to step back and savor the season. :-)


Step 5- Apply the tops!  I used tissue lamé for mine and they were made from 2 pieces of fabric and sewn on the machine.  Since tissue lame loves to fray, I traced the shape on a doubled piece of fabric.  I sewed along the top and side edges leaving the bottom free, and trimmed around the stitching.  Then I turned it inside out and tucked the free edges in.

I prick-stitched the tops on as I was afraid traditional appliquéing would mar the structural integrity of the tissue lamé.


Step 6- The final step is connecting all the ornaments with gold cord!  Enjoy!


(see more pics of the finished skirt here!)

For my recipe to share with this blog tour, I knew I had to share our family's longest-standing Christmas: gingerbread men!  I remember making them with my Grandma when I was just 3, and I'm planning on making a batch this Sunday. :-)

Gingerbread Men

1 c. molasses
1 c. butter
1 c. sugar
1 egg
1 tsp. vanilla
6 c. flour
1/2 tsp. cloves
1/2 tsp. ginger
1 tsp. cinnamon
1 tsp. salt
2 tsp. baking soda dissolved in 1/2 c. hot water

Simmer molasses and butter together for 15 minutes.  Cream egg, sugar, and vanilla.  Add baking soda and water.  Mix in dry ingredients and molasses mixture.  Chill.  Roll 1/4 in. thick and cut out.  Bake at 350 for 8-10 minutes.

Thursday, July 16, 2015

· 1930s Pocket Tutorial ·


For those of you following me on Facebook and Instagram, this is old news- but I'm thrilled to announce that I'm part of the Penny Rose Project Design Team!

Penny Rose is a fabric company that has many different lines of 1930s, historical, and floral prints.  When they contacted me about sharing a project made from their fabric, I was excited about all the possibilities!  I've been on a big 1930s kick lately, so I naturally picked a 1930s print to make into a new dress. :-)


I'll be sharing details of my dress next week here on my blog (edit- here's the post!), but this week I have a special post over on the Penny Rose blog- a tutorial for making your very own 1930s pocket! :-)  I'm sharing it here on the blog, too and I'd LOVE to see your results!!

The finished pocket measures approx. 5" square, so it's a cute size for dresses and aprons and even tote bags or pillows. :-)


The pockets on the far right were my inspiration.

I decided not to do contrasting "petals" on my pocket for this tutorial but I made contrasting petals for my dress, as you can see. :-)


To start, cut 4 rectangles 2 3/4" by 7 1/4"


To make the rectangles into isosceles trapezoids, make marks 1 5/8" from one edge.


Cut on an angle from the mark to the opposite corner.


Make a mark 3 1/4" from the top.


Sew one group of 2 pieces together from the bottom until the mark, using a 1/4" seam allowance. 


Each piece should be sewn over half-way up, as you see.


Press open.


Next, join the pocket to the 2 remaining trapezoids, pinning around the outer edges and down the inside edges of the "petals".


Be sure to fold back the seam allowance on the bottom corner of the trapezoids.


Sewing with a 1/4" seam allowance, butt the stitching up to the previous seam, sew down one petal, around the outside, and down the other petal, ending the stitching to meet up with the previous seam and making sure to backstitch at the beginning and end. 


Completed stitching!


It's a bit hard to tell, but here you can see how the stitching lines up with the previous seam.


Trim those corners! (and yes, both pairs of my shears made it into this shot- haha!)


Since we didn't sew together those 2 trapezoids, you can turn it right-side out through that opening.

Iron everything flat.


Fold back the petals and iron in place.


Flip it over to the back side and press the seam allowance under on both edges.


Using a ladder-stitch, sew up the seam.


Now you can admire your work!

Sew the pocket to your project around the outer edges, leaving the petals free.


If your petals need it, tack them invisibly near each edge.

And there you go- your own vintage pocket!  This design lends itself perfectly to contrasting petals, so play around with options!  I'd love to see what you make! :-)


Copyright © 2013 Mode de Lis . All rights reserved. | Designed by PrairieRoseDesigns.com