Related Posts Plugin for WordPress, Blogger...

Wednesday, December 30, 2015

Sewing Recap · 2015

The end of the year is always a great time to reflect, so I'm thinking back to all of my sewing projects from the year today. :-)

2015 was a very full year, even though it wasn't super full of personal sewing projects... I always have something in the works, but sometimes they take a little longer to finish than others. ;-)


1, 2, 3

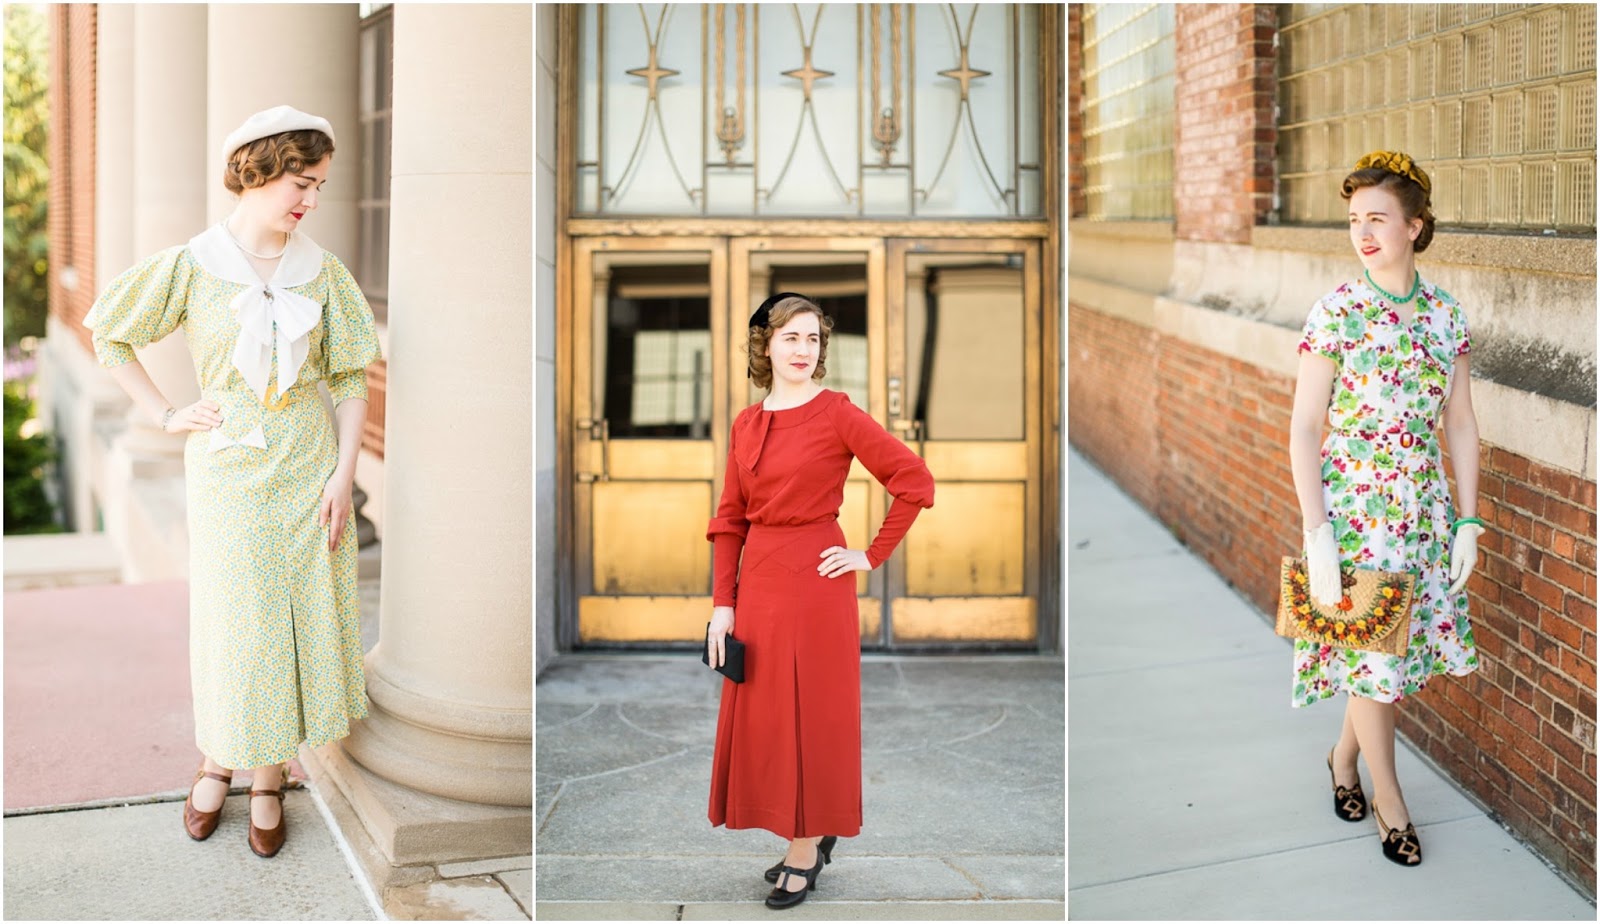
My non-1950s attire for the year. ;-)  I felt like I did a lot more 1930s sewing this year, and I guess I did... they just haven't been blogged about yet. :-P  The 1940s dress might not count totally, but it was an extensive remake!


1, 2, 3

My favorite and most common thing to make are 1950s dresses, so I was shocked that I only had 3(blogged about)!  Like I said, it was a slow year on the sewing front...


1, 2, 3, 4

My biggest change this year was delving into more blouses and skirts!  This was partially to fill a void in my wardrobe, but mainly to creatively use up fabric remnants. :-)  All of the blouses pictured were remnants from other projects.


1, 2, 3

Kathryn also was feeling the separates memo, too. ;-)  Although this does put into perspective how very many more outfits she really should possess, considering how amazing all the photos were this year!  (sorry dear! 2016 will be better, I promise. :-))

Not included in this post, but coming eventually:

-1950s novelty print dress
-1930s blouse
-two 1950s blouses
-1950s plaid skirt
-1950s twill skirt
-1930s rayon dress
-1930s evening gown

I felt like I finally got my wardrobe up to "more than necessary" on the quantity front, so I guess that's why I decided to sell several of my dresses on Etsy. ;-)  More will be coming shortly to the shop, so stay tuned!  I guess I just love keeping my wardrobe at the bare minimum level. :-P

Oh, and 2015 marked the end of one of my most faithful dresses- my fruit dress.  She was my favorite for years, was my trusted "travel dress" (that outfit never set off any alarms and always garnered raving compliments in airports- always a good thing ;-)) and eventually she just gave out. :-(  Anyone else experience wardrobe casualties this year?  I'm torn between trying to replicate it and just moving onto something else....


Well, that's it for my recap!  I rather enjoyed putting it together; it was fun to see the common themes that ran throughout the year!  I feel like I'm also more aware of the gaps in my wardrobe and I'm looking forward to seeing where I go in 2016. :-)  Thanks for following my ventures for another year!

· Photos by Kathryn ·

Thursday, December 24, 2015

· A Very Merry Christmas to All of You! ·

source

I hope this coming weekend is filled with joyous celebrations as you celebrate this Christmas season!  I featured some favorite 1950s Christmas cards in my post last year, so I thought I'd branch out into the 30s this year. ;-)

Enjoy!

source

source

source

I'll be traveling back home for a nice relaxed weekend with my family- what do you all have planned?

And how about these fashions!- which is your favorite?  I am torn between them all- those fabulous mittens!! that perfectly floaty evening gown!- but I think I might lean the most towards the last card with the red outerwear.  Sigh- luxuriant fur! jaunty feather! gauntlet gloves!

Thursday, December 17, 2015

· 2015 Christmas Outfit ·


My festive outfit this year has a couple of new things going on that signal a few personal changes this year.  Nothing deep and of life-changing import (ha!), just the fact that I made a circle skirt after swearing them off years ago. ;-) They are the ultimate in impracticality in windy/gusty climes such as the midwest, so I previously avoided them.  I'm throwing caution to the wind this year (agh... how do I always come up with unintentional puns?? pretend that didn't happen...) and embracing one just for the fun of it. ;-)  After all, if you're doing a 1950s appliqued skirt.... it had better be a full circle.  Also, my mexican skirt did a fair share of weakening my defenses. ;-)

The other way this year is different is that I've now relocated from the gusty midwestern plains to... the Windy City.  I am just doomed to wind, I guess.  It's a temporary change, but I'm enjoying the experiences of an urban location. :-)  Naturally, taking outfit photos downtown is a must, so off to find lighted trees we went!


I've already posted about my ornament skirt in my tutorial post, so I won't elaborate on all the details involved with the applique process...
My partnership with Riley Blake Fabrics' Stitch n' Kitchen Christmas Blog Tour was such a great opportunity to make another Christmas-themed novelty outfit. :-)  I do love a good novelty print, but this time I did something a little different and appliqued novelty designs!

Initially, I wanted to get a festive photo setting for the tutorial photos, but I was rapidly running out of time before my deadline and actually, the skirt was in a remarkably unfinished state for that post!  You'd never know it, but the back of the skirt wasn't completely appliqued, there was no waistband, and no zipper.  Well, I'm pleased to report that this skirt is absolutely and completely finished now. ;-)  There are no secrets this time!


See?  Bragging zipper photo!  Unabashed back shot!  I must be all finished!


The waistband is from a 1950s skirt pattern that we've had for ages, but I just never got around to using.  This project seemed like a good time to fix that. ;-)

The skirt has pockets on both sides as well as a side zipper.  It was a little tricky figuring out how to insert a regular zipper underneath an on-seam pocket, but it all worked out in the end!


Ahh, the infamous waistband.  The story is far too long for sharing here, but suffice it to say that this unassuming little piece was the source of the most agony of the entire outfit- all due to the Postal System.  Sigh.

However, it still remains true to my original design, so all the ups and downs leading to this point can now fade away. ;-)

It wrinkles a bit, as expected, but overall I'm pretty pleased with the way it's behaved.  Time will tell whether I'll have to come up with a different interfacing plan after washing, but I'm hoping it holds up.  This waistband is much wider than any I've made so far, so I'm still anticipating some learning curves in getting it just right!


Also, waiting a couple weeks to take these photos meant that I now have a new sweater to wear!  This fun sparkle confetti sweater is from Kohl's this year- altered to a more vintage style using this method.


The glittery gold cord, ornament tops, and star fabric got the wheels in my brain turning, and inevitably led to another project....


... Because when one is pushing the limits of a deadline, one should start unnecessary-but-"boy-that-sure-would-be-a-nice-touch" sorts of things, right?

Thus, I have a brand new gold dotty blouse for the occasion. ;-)


The blouse is made of the leftover scraps from my Gold Dotty birthday dress.  I love, love, love that I was able to fit 2 projects on this fabric!!!

The blouse portion is just made from my self-made bodice sloper, while the collar/bow is taken from a 1950s maternity pattern that I love!  I figured this would be a great opportunity to make use of it!  The boat neck is a fun change, I love the way the collar is pleated up a bit at the center front, and the tab is a nice touch. :-)


Kathryn was entirely skeptical that I would disrobe down to short sleeves in the winter evening (and I did receive more long looks from passersby...), but after putting that much effort into a blouse that would coordinate *just* right, it seemed only appropriate. ;-)

And besides, I don't look cold in these pictures because I really wasn't. ;-)


And can we just have a moment to say how amazing it is that there was no wind that night in the Windy City??  I was pretty sure a circle skirt was going to be a stupid decision, but it worked without a hitch!  Turned out to be a quite perfect night to take photos, despite the cold and (boohoo!) lack of snow.... What is it with my Christmas outfits not having snow in the photos?? :-P

All in all, it's a delightfully festive skirt that I had a blast designing and making!  And judging by the amount of compliments from a broad range of people, I'd say it's pretty close to being universally admired. ;-)

· Photos by Kathryn! ·

Wednesday, December 9, 2015

· Perfectly Autumnal Mexican Skirt ·


A month ago now, I was able to get together with Kathryn to finally grab some shots of my fabulous vintage skirt I found this past spring, and we had a splendid location for them!  I absolutely adore it when we can get photos like this of outfits that so perfectly mirror their surroundings!  The coordination was totally unplanned, but the photos turned out better than I ever hoped for. :-)


Ever since starting our estate sale habit this past spring, we've been adding to our collection of old odds and ends around the house- most frequently jewelry, it seems!  Clothing tends to be few and far between, and I'm in a place right now where I'm perfectly happy making my own clothes so I don't feel the need to be a truly aggressive shopper.

All that being said, we have been able to add a few things to our wardrobes, and this fabulous skirt is one of them. :-)


It's a hand-painted mexican circle skirt!!  To be honest, this was never a "holy grail" item for me- in fact, I'm not entirely sure I knew they were a thing.  However, I adore this skirt.  I was planning on making a summer-y blouse to go with it, but that just never panned out this year... I think the color scheme transitions quite nicely to fall though!


The skirt was in impeccable condition; the painting is done in metallics and gives the skirt a nice stiffness that makes it feel almost formal.

An added bonus to the skirt is that it's exactly my size!  I'm not as small as the usual offerings we come across, so I was fully prepared to alter the skirt to fit but it's nice to not need to. ;-)


As a side note, I actually ended up getting a black crinoline a few weeks after these photos, and it's both fuller and more color-approriate-when-glimpsed than this one and thus more suited to a photoshoot....  Ah well, can't win them all. ;-)


Oh, and can I just say YAY! for the weather being non-humid and cold enough that I feel like wearing my hair down!!  I enjoyed the break from setting it every night over the summer, but I'll be honest... I was actually missing the process by Sept.  That surprised me, but hey, I'll take it!

After my (mis)adventures with a middy cut last year, I decided to play it straight this year (no pun intended. No really, it's not intended...) and get a plain bob with just a little bit of layering.  So far I think it's a vast improvement, but I'm still open to a little more tweaking... ;-)


I paired it with my stand-by, why-in-the-world-didn't-I-make-this-years-ago blouse and a sweater I got from Kohl's last year and altered for a more vintage-appropriate fit. (but hooray for that vintage-esque beading!)


Thanks for visiting!

· Photos by Kathryn ·

Saturday, December 5, 2015

· Procrastinators' Christmas Sale! ·

This year, I'm offering a special deal for those procrastinators who didn't get all their shopping done in the Black Friday rush!  Or maybe I'm offering it now because I didn't actually get around to putting on the sale until this week... ahem.  What can I say? I'm just catering to the customer base closest to my heart. ;-)

Without further ado, here's the scoop!  30% off my entire Etsy shop with the code CHRISTMAS.  Yes, I get points for originality in coupon code names.

Expires this Sunday, Dec 6th at midnight, so shop fast!

If you haven't stopped by the shop lately, check it out!  It's currently at its plumpest, which also means I've got a lot of stock that I need to liquidate. ;-)  Patterns, repro and vintage clothing abound!


Thursday, December 3, 2015

· Deck the Halls Skirt Tutorial ·


For my post this week, I'm joining in the Riley Blake Fabrics' Christmas Stitch 'n' Kitchen Blog Tour!  I had such a fun time picking out which fabrics I wanted to use for a project, and of course I couldn't resist going in a quirky, mid-century direction. ;-)  This is now the second "novelty" Christmas outfit I've made... I sense a trend coming on...

Without further ado, here's my tutorial for making your own!

"Deck the Halls" Christmas Ornament Appliqués
Prep time: 10 minutes
Making time: 45-60 minutes (per appliqué)
Ingredients:

I adore the 1950s, so naturally I used my appliqués on a 1950s style circle skirt!  The appliqué design is so versatile and it could be used on just about anything.  Tea towels, tote bags, other clothing items- the list goes on! :-)


Step 1- Cut out appliqués, adding extra if appliquéing by hand.  The pattern is for the finished size, so I added 1/4" to the perimeter of mine.


Step 2- Mark the finished size on the wrong side of the fabric for an accurate finished result.  I used a blue water-soluble pen, but it's a bit harder to see the marks in photos than real life. ;-)


Step 3- Staystitch along the marked line by machine, then use the stitched line as a guide for folding in the excess.  Iron smooth.  I found that the circles and the curved edges of the onion shape benefited from a single line of basting near the raw edge.

*Step 3 1/2* If you're making a circle skirt, now is the time to choose your placement of the appliqués!  This is the trickiest part of the project- I just adjusted them until I was happy and measured accordingly for the rest.  The amount of appliqués you use is highly dependent upon the width of your skirt.  Mine ended up having 34 appliqués.  But that makes for some weird math to duplicate it!


Step 4- Hand appliqué the ornaments in place.  I love how much control hand-sewing affords as well as being a great way to take some time to relax and enjoy the process!  This isn't a "quick and easy" project, but especially in a season that can get hectic and stressful, I enjoy having a project that forces me to step back and savor the season. :-)


Step 5- Apply the tops!  I used tissue lamé for mine and they were made from 2 pieces of fabric and sewn on the machine.  Since tissue lame loves to fray, I traced the shape on a doubled piece of fabric.  I sewed along the top and side edges leaving the bottom free, and trimmed around the stitching.  Then I turned it inside out and tucked the free edges in.

I prick-stitched the tops on as I was afraid traditional appliquéing would mar the structural integrity of the tissue lamé.


Step 6- The final step is connecting all the ornaments with gold cord!  Enjoy!


(see more pics of the finished skirt here!)

For my recipe to share with this blog tour, I knew I had to share our family's longest-standing Christmas: gingerbread men!  I remember making them with my Grandma when I was just 3, and I'm planning on making a batch this Sunday. :-)

Gingerbread Men

1 c. molasses
1 c. butter
1 c. sugar
1 egg
1 tsp. vanilla
6 c. flour
1/2 tsp. cloves
1/2 tsp. ginger
1 tsp. cinnamon
1 tsp. salt
2 tsp. baking soda dissolved in 1/2 c. hot water

Simmer molasses and butter together for 15 minutes.  Cream egg, sugar, and vanilla.  Add baking soda and water.  Mix in dry ingredients and molasses mixture.  Chill.  Roll 1/4 in. thick and cut out.  Bake at 350 for 8-10 minutes.
 

Copyright © 2013 Mode de Lis . All rights reserved. | Designed by PrairieRoseDesigns.com