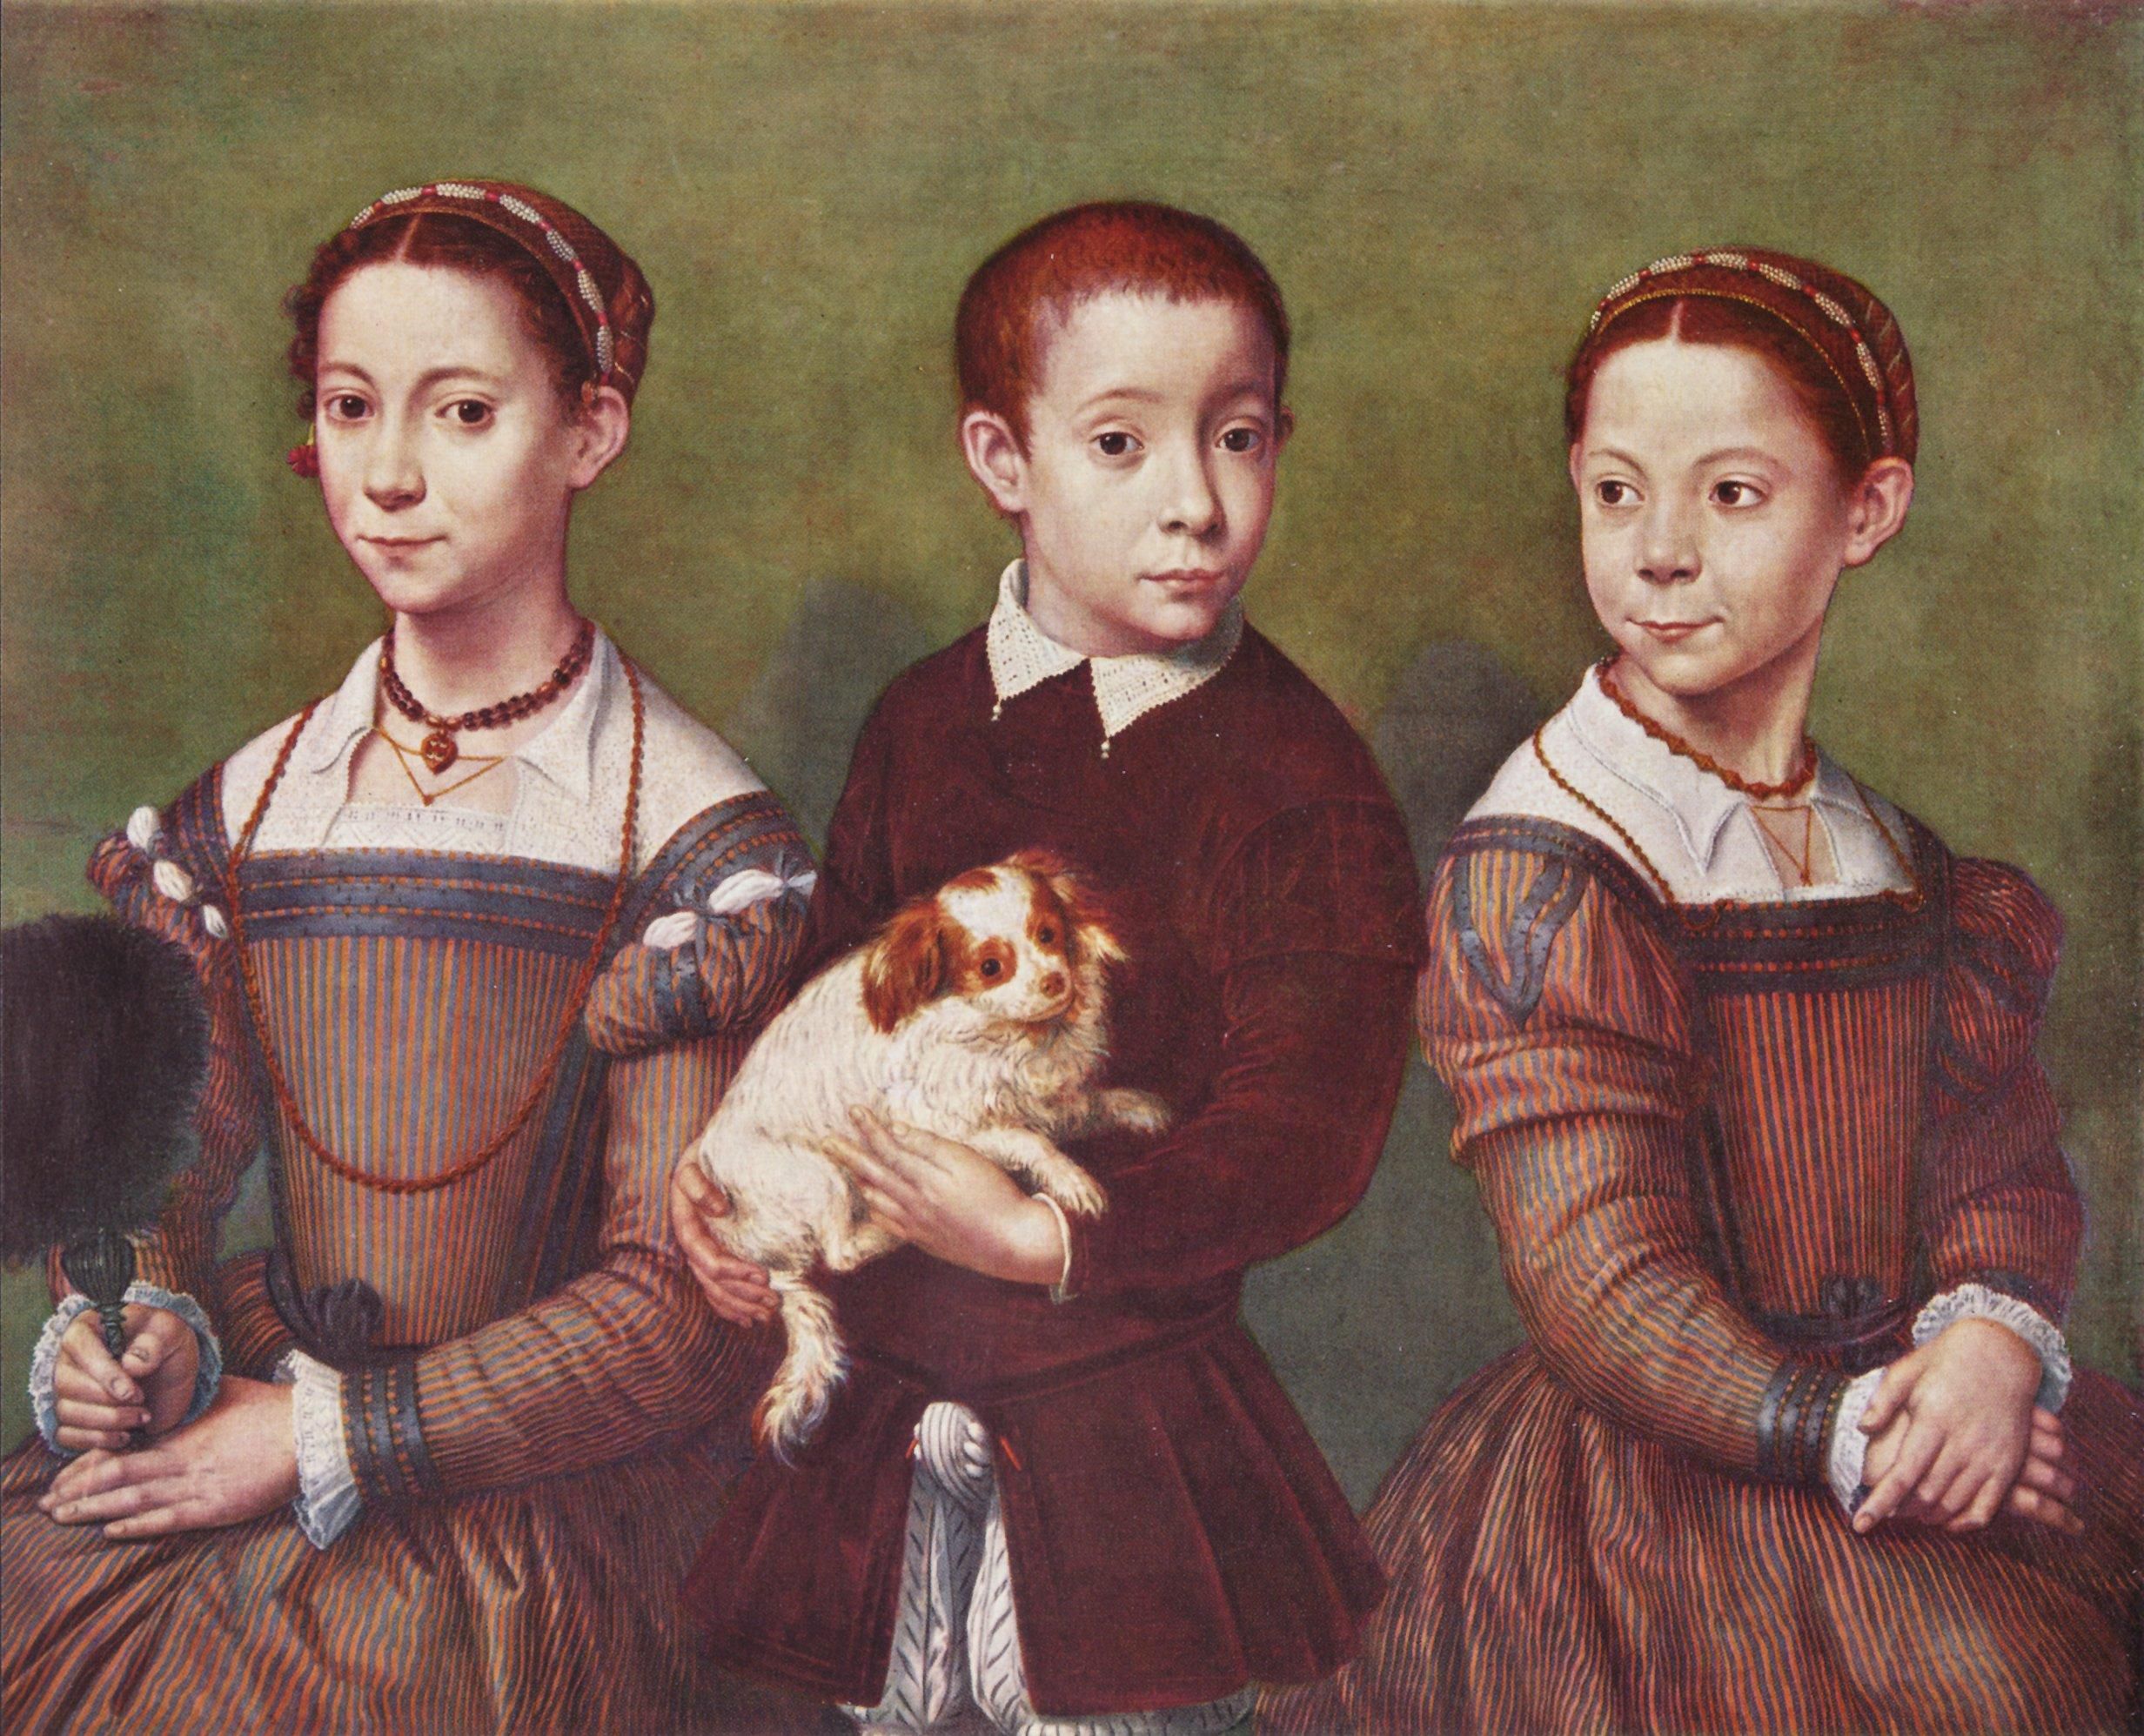
These dresses were lots of fun to "design" and deduce! :-) It's a bit like an episode of "Spot the Differences" when we wear them, and I'll point out the differences in this post. :-) Here's the first post of the series, and here are the "portrait recreation" shots.
For the dress fabric, I wanted something with body so that the skirts weren't too limp, but I also didn't want something too bulky to make the sleeve puffs on my dress. I also felt that a subtle stripe was a necessity, and under $10/yd was an added difficulty. We had absolutely no success finding a fabric with colors like the portrait, so we settled on looking for a brown. After searching around a lot, Mom ended up finding a brown corduroy stripe online, on sale. :-) I never knew there was a fabric like this- it has stripes of corduroy alongside stripes of plain twill. I am very pleased with the weight, hang, and overall look of it! :-)
I was able to find 40 yards of black velvet ribbon on eBay for much less than I could find anywhere else. I figured 40 yards would be enough that I wouldn't have to scrimp on anything; the dresses ended up using about half of that, so if my calculations are correct, I'll have enough to add 3 rows of ribbon to the hem of the skirts next year. As long as the ribbon doesn't get commandeered for a different project before then.... ;-)


Gretel slaved away figuring out and making these hairnets! After studying the portrait, I knew that a cloth caul was out of the question, since the cording used to tape their hair is visible. There isn't a wealth of information out there about daintier hairnets out there, and I knew I wouldn't have time to do all the research and make them so I handed off my preliminary findings to Gretel and let her figure it all out. :-) After watching the process, I'm completely in awe!! Silkewerk.com and AnneLiese's site were the main resources she used. We couldn't source the right kind of silk, so she used cotton crochet thread which was alright, but has definite drawbacks. Each hairnet is comprised of 1200 knots, and took 12 hours to complete! She's amazingly perseverant, especially considering that her first net didn't work- so she essentially made 3 hairnets. Mom beaded the edge with gold seed beads, and Gretel made the beaded headbands, which we sewed into place.
Gretel has a coral necklace with shaped beads, and her partlet has a wide collar trimmed with cotton lace. We weren't quite sure what the triangular cording was in the painting, but we interpreted that as a braided cord, strung through thread loops in the partlet and secured on the horizontal lace strip.


Her sleeves are a gentle leg-o'-mutton style, with 2 rows of ribbon chevroning in the center. We ran into a bit of an issue when deciding on her trim placement- the picture seems to show 2 different placements for the trim, with the farther sleeve having a much wider "V". We ended up coping the most visible sleeve and replicating it on the other. The dresses close on both sides with hand-worked eyelets and spiral lacing. This was the first time I've made a dress that closes like that, so it was something to cross off my bucket list. ;-)

Gretel's long coral necklace is worn tucked into the neckline of her dress. Her waistline is trimmed with 1 row of velvet ribbon and a loopy bow and she has 2 rows of trim on each shoulder.


I used the Eleonora de Toledo pattern from Janet Arnold's Patterns of Fashion 1560-1620 as it had a remarkably similar look to the portrait. The fact that they were both Italian and from the same era sealed the deal. ;-) That also gave me an idea of how to make the back of the dress since the portrait was less than helpful in that aspect! The skirt pattern also came from there- it is flared, with the center front smooth and pleated on the sides and back. My dress also closes along the sides, near the trim lines.
If you think about it hard enough, you can make out my gold hair-taping on the right picture. ;-)

My coral necklace is worn like normal, and my dress has 3 rows of ribbon on each shoulder.
The fan in action! :-)

I was able to find an amber bead that was a similar shade to the painting, even if not the same shape. The black glass beads are spaced with bronze-colored pearls.
The partlet is made and lined in linen, with cotton lace on the front inset, and a smaller collar than Gretel's. You can just make out my thread loops for the cording. My speculation is that the lace-trimmed portion is the upper edge of their smock- that would undoubtedly be much easier to wear and keep in place than what we did! As it was, we had to make do with what we had and pin the strips in place. Room for improvement next year! ;-)

My waistline is trimmed with 2 rows of ribbon, and has a slightly different "bow".

I've wanted sleeves like this for so long! :-) Since I don't have an appropriate smock to wear with this dress, the linen showing at the sleeves is an added strip of fabric, basted in place.

Thanks for all of your enthusiasm about these dresses- they were such a fun challenge! :-)
· As always, photos by Kathryn! ·


.jpg)
.jpg)
.jpg)
.jpg)

.jpg)
.jpg)


 Posts
Posts