Related Posts Plugin for WordPress, Blogger...

Saturday, September 28, 2013

Past Projects · 1950s Ric-Rac Dress


This dress has been a favorite for years!  I found this super cute ric-rac fabric on clearance at Hancocks a few years ago, and wanted to do something interesting and out of the ordinary with the stripes.   I found pictures of a vintage dress that fit the requirements and then went to the work of replicating it!  This dress was a really big challenge to pattern and fit, since moving each seam or the angle of a stripe by just a fraction of an inch ends up affecting the whole bodice in unexpected ways.   But, (other than being completely unable to match the stripes on the side seams) I was successful! :-)  Once the hard work of drafting and fitting the pattern was over, the main part of the dress was really was easy to make.  The fabric is sheer enough to easily see the stripes from the wrong side while sewing, so making sure everything matched up while it was being assembled was a breeze!  I get lots of comments of "Oh!  I can't imagine matching all those stripes!" but I always have to smile, because the process of actually sewing it was a piece of cake! ;-)

The skirt is trimmed with a band of bias fabric.  The neckline is edged with fabric and then the front detail has bound buttonholes with fabric trim (which is incidentally a very handy place for storing small scissors while sewing! ;-) )
And, as always, silliness abounds with the Yens. ;-)
· Pictures by Kathryn ·

Wednesday, September 25, 2013

Reformation Day 2013 · Starting Things Off

Our church hosts a Reformation Day celebration each year and, of course, we always use it as a perfect excuse to dress up!  There is usually a different theme to each year, but since I like to re-wear my costumes as much as possible and don't have many other opportunities to wear renaissance clothing, I don't worry too much about fitting into a particular era or country.  The theme this year is about ancient celtics, and really, I don't have any desire to wear a sack to Ref Day. ;-)  Years ago, I came across the painting "Three Children with Dog" by Sofonisba Anguissola and was smitten!  I love the idea of sister-dresses that are so similar, but with their own personalization.  Gretel easily agreed to the plan, and volunteered to help with accessories and hand-sewing.  We'll be making some adjustments, and while I have the inclination, I just don't have the time to make them perfectly historically accurate so we'll be cutting some corners there.  


The first part of the project was making on my "pair of bodies" (corset).  I'm not sure if I technically need to make a boned undergarment, or if it's more accurate to just bone or otherwise stiffen the dress.  After my minimal research, I'm inclined to think that going the Pair of Bodies Route wasn't the most accurate, but given my frustrating prior experiences over the years, I really prefer the way everything behaves and the ease of adjusting the finished dress when there's a separate "corset" and dress.  I got my mock-up successfully made and fitted but I was a little stumped by how exactly they're supposed to differ from 18th cen. stays, as they're remarkably similar in shape?  I'm still not sure, but I decided to just go ahead and make them anyway.  We've decided to save time by not making a pair of bodies for Gretel, since she has stays.  Here is the completed pair of bodies- except for running out of cable ties halfway through, it was entirely a stash project!  Yay! :-)  It is made from 2 layers of duck, boned with heavy-duty cable ties, the busk was made from a paint stick, and the eyelets are done by hand.  I used the Tudor Tailor Effigy pattern, except with a busk in front, and the lacing in back.


After spending so many years sewing 18th century, calling these a "pair of bodies" instead of "stays" feels so strange.  Not to mention awkward when someone asks what you're working on... "oh, I'm just sewing a pair of bodies!" :-P

Saturday, September 21, 2013

Past Projects · Mid-1500s Flemish Working Class


Three years ago, I wanted to make a new outfit for our church's annual Reformation Day Faire.  I wanted something that fit into the 1500s, but didn't have any more specific requirements for myself than that.  I came across Jen Thompson's great write-up about her mid-century Flemish working-class outfit and was enthralled.  I needed one!!  I was making costumes for the security guys at the Faire that year too, and there happened to be enough wool left to use for my gown, although the skirt lining required extensive piecing! :-)  I relied on Jen's information (which I'm having a hard time finding now!) and Drea Leed's research almost exclusively.  One of the aspects I loved about this project was being able to understand all of the layers involved, so that when I look at Aertsen and Beuckelaer's paintings now, they make so much more sense!  It's always so neat to see how each era has it's own quirks and to try to discover the secret to getting the garments to look like the paintings.

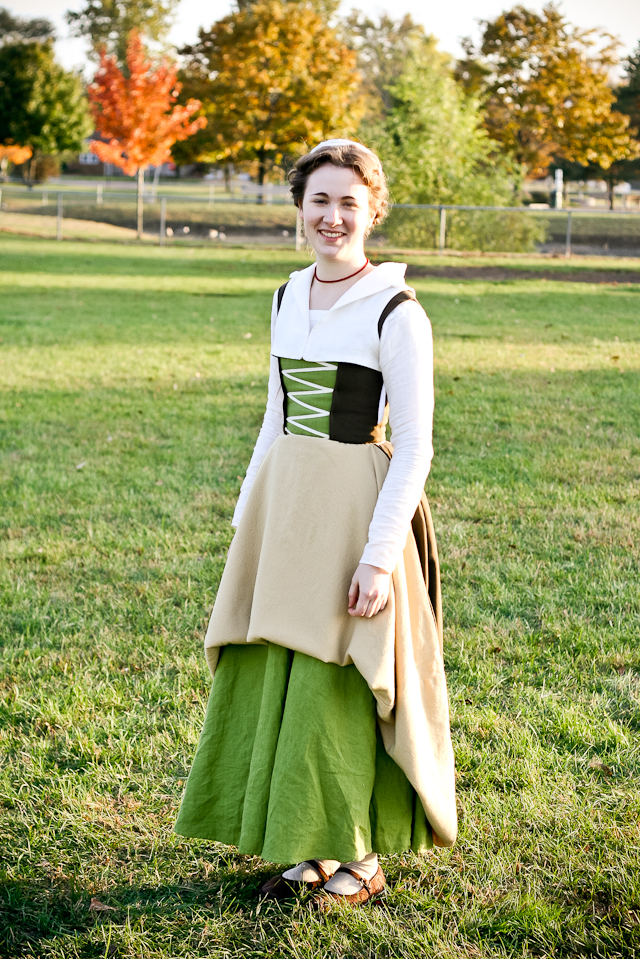
The gown (brown and tan) is made of wool, and the kirtle (green), smock, partlet, and caul are made of linen.  The smock is the first layer and can be seen at the sleeves and peeking out of the neckline.  Next is the fitted kirtle, which is sleeveless and laces down the back.  After that comes the gown which laces down the front with hidden eyes and twill tape.  Finally, the bodice is topped with the partlet which fastens with hooks and eyes at the center front, but also has ties under the arms.  Additionally, I made detachable sleeves which attach by eyelets and lacing, but since the weather has never been cold enough the past 3 years, they haven't had an outing yet. ;-)


The front half of the skirt is a half-circle, whereas the back is a pleated rectangle.  The entire skirt is lined in wool and then the front flipped up to expose the lining and the kirtle's skirt.  The front skirt is held in place by a length of twill tape tied securely around my waist.


Pleated frill on the partlet


My hair is twisted around the head and then braided and taped.  The caul is just big enough to fit over the taping securely, but I like to use a few judicious pins for ease of mind. ;-)

·Pictures by Kathryn·

Thursday, September 19, 2013

·1940s Photo Shoot Pictures!·

Hop on over to Kathryn's blog to see the pictures of our 1940s photo shoot!! :-)


Wednesday, September 18, 2013

·1940s Polka Dot Dress·


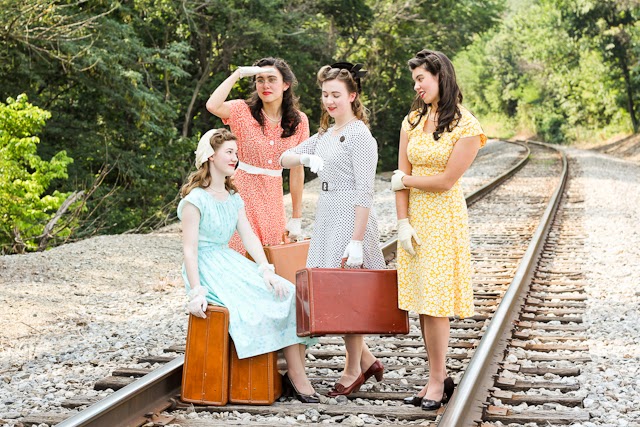
The Yen girls got together with Gretel and me 2 years ago to dress up for a photoshoot all decked out in 1950s hair, clothes, and makeup. (Well, and to go out for ice cream, too...)  We all agreed that the experience begged to be repeated, and that we should dub it the "Decade Project"- each year we'd get together and dress up from the preceding decade!  Alas, I foiled all of our grand plans for 1940s in the summer of 2012 by being out of state from the beginning of June through the end of October.  When the spring of 2013 rolled around, my schedule got packed up quickly, but this time I was determined to make it happen, no matter what!! 

Personally, I've never been a fan of 1940s fashion.  The shoulders are so boxy, the skirts so short and un-twirly, the necklines so high, the bodices so uninteresting, the forced rationing so evident.  In short, I don't like it.  Honestly, one of the motivating factors to have the 40s photoshoot a success was the thought of doing 1930s next year. ;-)  Since I had 2 years to get my plan of action in place, I worked hard to convince myself that I liked the 40s.  After all, there had to be ONE dress in 10 whole years that I liked- right??  Over the past year, I've started falling in love with 40s hairstyles, so that helped matters.  Eventually, I decided to use a vintage polka-dotted cotton that I was given from the stash of an elderly woman a few years ago.  It had been saved carefully and lovingly for a darling project, but I never had the perfect idea for it.  There was the exact amount for a 40s dress, and I figured that since a polka-dotted dress is impossible to despise, it made the ideal choice. ;-) 

This project is a testament to how much I'll do for my friends.  So Tara- I hope you realize how much I went through for you. ;-)


I used Butterick 5281 since I despise jewel necklines, and this was sufficiently non-jewel-y and yet "40s".  I ran into some really odd fitting issues with the shoulders and sleeves and ended up taking the shoulders up 2 inches.  Part of the problem could be that I didn't use shoulder pads (although the pattern never called for them), but 2 inches is really excessive for even that!

The pattern had enough unique detailing for me to be satisfied, and it helped me to be slightly more reconciled to the 40s.  Who knows- I could end up even liking the decade eventually! ;-)

Great use for this vintage belt buckle from the stash!

I love the details like the triple elbow darts and the vintage button accent!

My super-exciting thrift store find in TX- 40s style shoes for $1.25!! :-)


My latest obsession- vintage luggage.  So glad we had the perfect opportunity to take advantage of my growing collection! :-)
Decorative seaming on the skirt, and pleats on the right shoulder.


All things considered, it was a great challenge!  I now have a deeper appreciation for the 40s and I'm MUCH more likely to make another 40s dress. :-)

Keep an eye on Kathryn's blog for pictures of the 4 of us! :-)


Saturday, September 7, 2013

·1950s Bow Back Dress·


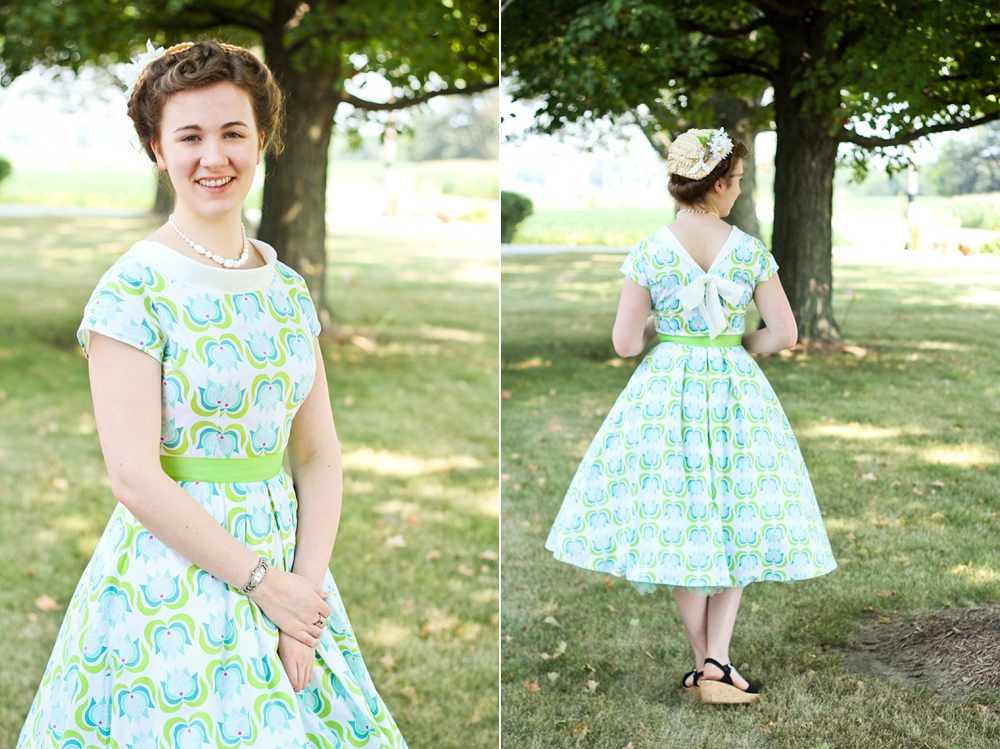
Years ago, we found some cardigans that I really liked and bought all three colors they had.  Only problem was, I didn't have anything that matched two of them.  Sooo, this blue cardigan sat around, waiting to be loved, until I made an outfit to keep it company. :-)  I'm not usually drawn to blues, but when I saw this fabric at a going-out-of-business sale, it was love at first sight!  It looked like it would go great with my lonely cardigan, so that was that.  I found a darling vintage 50s pattern on Pinterest, but I couldn't get my hands on a cheap enough copy so I just made it up instead. :-)  I used Butterick 5605 as my starting base.  I was really excited when this pattern came out, because like I mentioned in my Black Eyelet Dress post, I have a love/hate relationship with regular kimono sleeves.  I love that this pattern uses princess seams, as that will increase my design opportunities without having to deal with a yoke seam like on Vogue 1044!  I loved the pleats in the skirt on the pattern, and decided to make the pleats in the front, too. :-)

 This dress used to be even cuter, because the ribbon trim at the waist was originally polka-dotted, but I made the unfortunate discovery that it does not wash well. :-(  I'll just remove the trim from the sweater before I wash it, but given my self-imposed design specifications, there isn't a good option for the dress.  Unless I find washable ribbon!

I altered the neckline to suit, and then added a bias strip to make the collar and added a bow in the back.


The cardigan that started it all! (Yes, this does mean that I've joined the ranks of women who buy accessories they like and then need an outfit to go with it.  No, I'm not quite sure how I feel about that. ;-))  Since embellishing sweaters is so much fun, I added the ribbon and buttons to coordinate. :-)


· Pictures by Kathryn ·

Thursday, September 5, 2013

·Banbury Cross Children's Cardigan·


I have long envied the adorable vintage-inspired sweaters that Laura of Quietude Blog has made for her children, so imagine my delight when I found out that she has now made a pattern for it!  Not being a knitter, I love the idea of using a thrifted adult sweater and cutting it down and sewing it into something new. :-)

Visit her Etsy shop to get your own, and stop by her blog to read more about the design, enter her giveaway, and get a coupon code!

Thanks so much for making this resource available, Laura!

Wednesday, September 4, 2013

Kitchen Remodel · Retro Style


Ever since we moved in years ago, we've never been sold on our kitchen.  It was just so character-less, dark, and well, boring.  The cabinets were new when we moved in, so replacing them wasn't necessary or really justifiable.  We tried using our decorating scheme and wall colors from our old house, but it just never really clicked.

Dark, boring, lacking in interest....

We eventually resigned ourselves to it and started ignoring the room, but then the Retro Kitchen Need became apparent.  You know, the one where every day on Pinterest you find pictures of darling 50s style kitchens?  And cute retro color schemes keep catching your eye?  And you start thinking about how much you'd love cooking if ONLY you had such a darling workspace?  Yeah, that one.  So, the scheming began.  Amazingly, we all hated the kitchen enough to go through all the work of painting the cabinets, walls, replacing the door pulls, and making and putting up new wide, white trim.  Even more amazingly, we all think it was totally worth it in the end!

But really- how could this not be totally worth it??
Every kitchen needs a red coffeepot, and every room needs a bunting. :-)
Yes Little English Villages, I love you for showing me how much I love bunting!!


We had this shelf before, but it got a fresh coat of paint to coordinate better.  The little vintage tins add a nice touch. :-)
We've still got a few more details to add to the room, but we all agree that it is a delightful room to be in!  Now, if only it magically made us love cooking, too..... ;-)

"After" pictures by Kathryn.


Copyright © 2013 Mode de Lis . All rights reserved. | Designed by PrairieRoseDesigns.com